Sunday, April 24, 2011

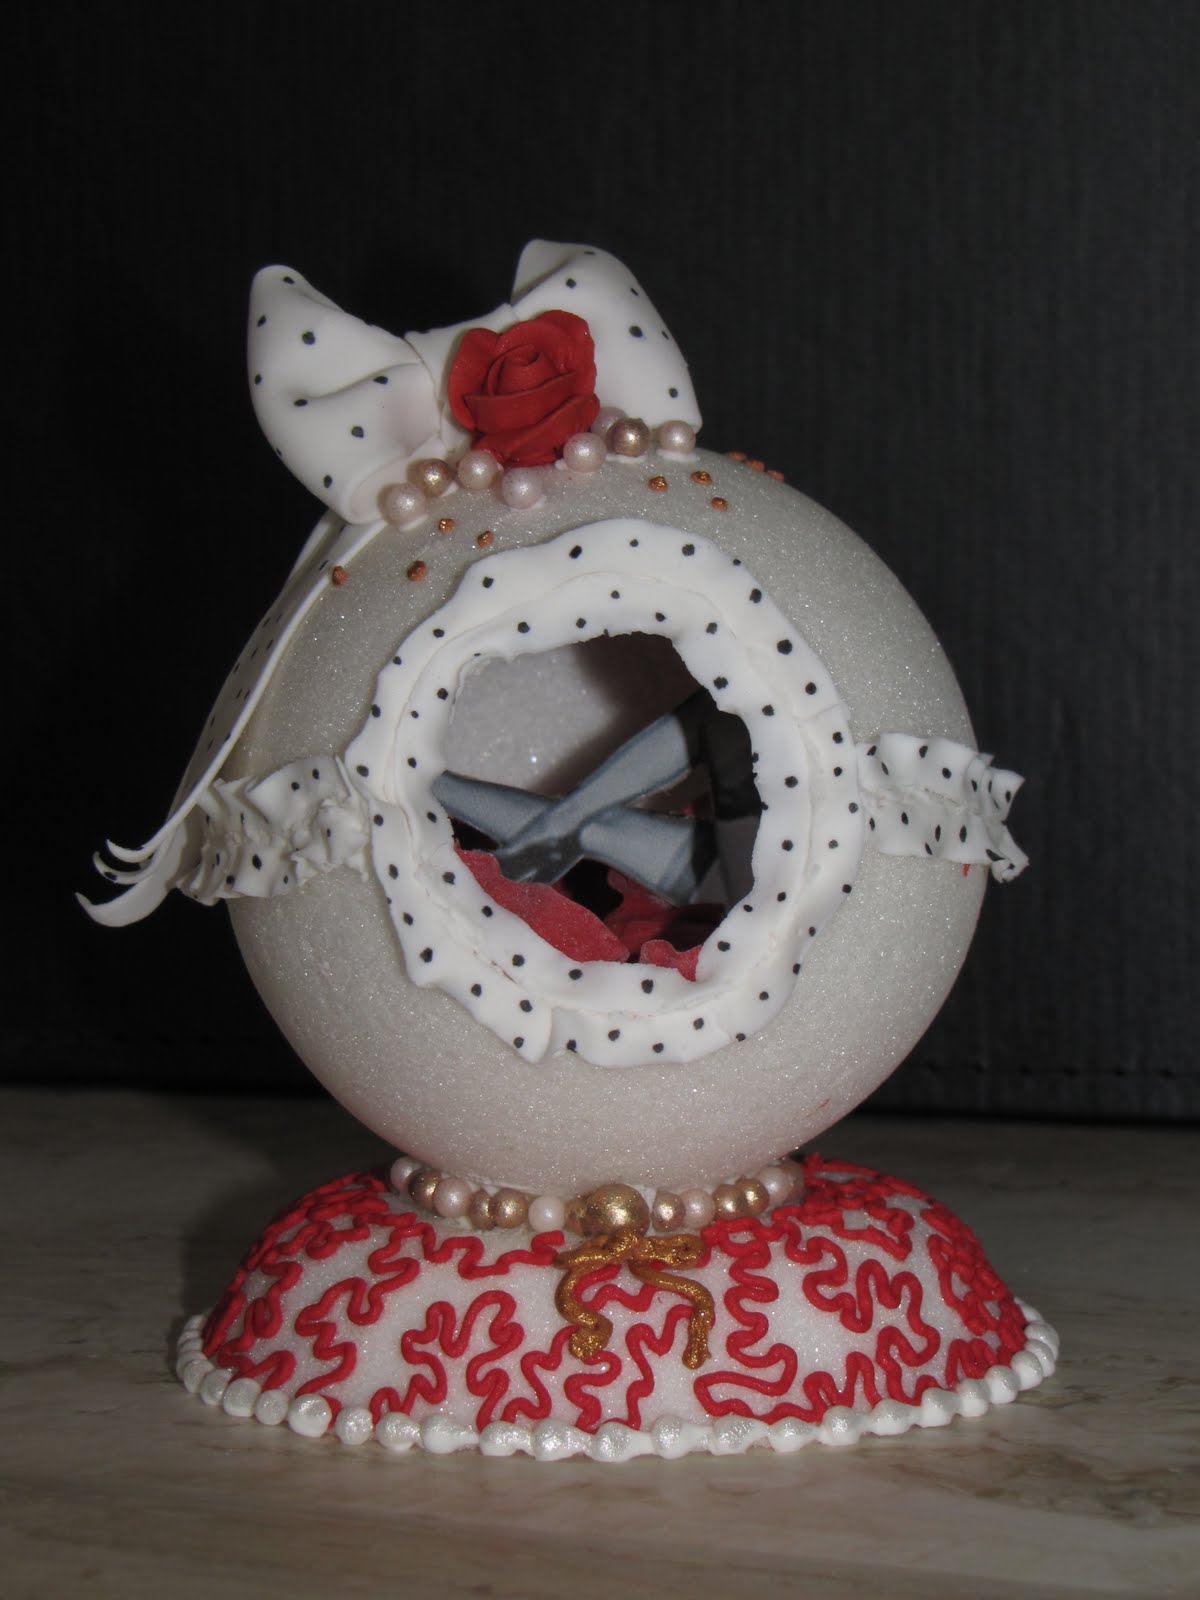
Panoramic Eggs

When I was little, some of my favorite stories were of secret doors, hiding places, and miniature worlds. At a time when no place was my own and just about everything was built for a person larger than me, nothing seemed more appealing than the tiny worlds inside panorama sugar eggs. So, since my introduction to confectionery about three years ago, I've been dying to make some.


For my first attempt, I wanted to create an Alice in Wonderland egg. Besides the obvious reference of traveling through the rabbit hole and other small spaces, both the books and panoramic eggs date back to Victorian England. In Through the Looking Glass, Alice also happens upon Humpty Dumpty, a classic egg character.


Sugar eggs are fairly easy to make. The "shell" is made by packing damp sugar into a mold, and then hollowing it after it has partially dried. I used vinegar instead of water so it would dry more quickly. The decorations are all piped in royal icing, except for the colored John Tenniel illustration which I printed on cardboard. I also had help from my boyfriend, Trevor, with Photoshopping out Alice so I could add her in separately.


My second egg is a PG-13 rated "peep show". When you peer inside, there is a pile of red gumpaste ruffle with two sexy legs sticking out. The decorations are all edible (minus the legs) and are composed of royal icing, gumpaste, and dragee pearls.


I had a lot of fun making these eggs, and I feel like the design possibilities are endless. Please send me any ideas that you have (puns and conceptual ideas are encouraged) and I'll try to make them for next year.

Tuesday, January 4, 2011

Final Weeks at the French Pastry School


Sadly, l'Art du Gateau is finished. The last few weeks were a whirlwind, with a major sculpture project, planning of our final cakes, and preparing for graduation. Here are the photos of the fruits of our labor. Above is a little brush embroidery project that I did. Brush embroidery is a piping and painting technique that has a texture resembling stitches.


Our sculpted cake project was another design by chef instructor Scott Green. I affectionately call it the "orphan cake," because I read the trunk as more of a suitcase than a toy chest. The cake employed most of the techniques we learned throughout the semester, including airbrushing, pastillage, pulled and blown sugar, and on and on. Because there were so many components, we worked in partners and still finished barely in time. The cake was supported by a structure of flanges and PVC piping, and although not required, we decided to tilt our boat in mid-squall position to test the limits of our structure. Honestly, it was not as sound as we had hoped and we lost the mast halfway out the door.


For the sweet 16 project we again worked with partners but created our own designs. My partner, Heather, was an Egypt enthusiast and dreamed up the theme of Cleopatra's sweet 16. We wanted to tie in components that would appeal to a present day 16 year old, so we dolled up the gumpaste sphynx and painted hieroglyphics of manicures in the palace and shopping sprees at Neiman Marcus.


These last photos are of my final project. The criteria was to make a winter wedding cake that included a monogram and a gumpaste floral arrangement. I chose to do an Inuit themed cake using images inspired by Inuit artist Kenojuak Ashevak. I love her use of bold shapes and vibrant colors that still carry the chill of winter.


Each side of the cake featured a hand-cut and dusted sugar animal, including a fish, two birds, and two polar bears. The boarders were patterns taken from Inuit anoraks and the bottom tier had bas-relief flowers inspired by Ashevak's work. The cake topper was a bouquet of hand-modeled gumpaste pine cones and berries.

My next adventure will be creating cakes with Chicago's Take the Cake!

Tuesday, November 9, 2010

Gumpaste and Fondant with Nicholas Lodge


For the last two weeks my class has been creating cakes with one of the world's top sugar artists, Nicholas Lodge. Chef Lodge is originally from England, but now primarily resides near his two schools in Atlanta and Tokyo. By the age of 20 he was the head designer at Woodnutts, one of England's best sugar schools, and creating cakes for luxury hotels like the Ritz and the Savoy in London. One of his many claims to fame was creating one of the official wedding cakes for Lady Diana and Prince Charles.


We created three cakes over the two weeks, fitting as many techniques into each as we could. The first cake we decorated was the Amour Cake. At the beginning of the semester we baked a traditional English fruit cake with almonds, walnuts, apricots, glace cherries, citrus peal, currants and sultanas. We then let it mature, brushing it with French brandy and glycerine for several weeks. After, we covered it in marzipan and royal icing, which helps preserve the cake, and decorated it for Valentine's Day. The cake will continue to mature ideally for a total of three months, although chef Lodge reports he once redecorated a 17 year old cake that was in perfect condition. I'm planning to stick a Santa's hat on the cherub and to serve it at Christmas.


The Winter Wonderland Cake uses common British decorating techniques to create vignettes, which I think are really nice for a children's cake. Many of the images are flat, but some sit forward to create a scene like a pop-up book. My favorite is the garden tools that have been left over the winter to collect snow.


We also created a wedding cake with gumpaste bows, sugar pearls and broach, and a gumpaste flower topper. The arrangement included a gardenia, miniature orchids and calla lilies and sat in a pressed sugar vase decorated with Cornelli Lace.

Sunday, October 3, 2010

Sugar Decoration


This is a Japanese-inspired fondant cake designed by our chef-instructor Scott Green for our sugar decoration final exam. I made all the components myself, including cast sugar platforms, a blown sugar sphere and birds, pulled sugar ribbon, roses, twigs, and grass, and "bubble sugar".


Sugar decoration is a lot like glassblowing. You work with a hot, amorphous putty that becomes hard at room temperature. It can be molded, pulled into sheets, or blown into hollow forms. When worked at the right temperature it takes on a lustrous sheen. It's maybe the most challenging pastry art because of the temperamental material, radiating heat lamps, and easily blistered fingers. But I love the result and hope I can find a blister-free way to incorporate some of the techniques into my cakes.


Saturday, September 25, 2010

Mold Making and Airbrushing

Class this week was devoted to mold making and airbrushing. I find that airbrushing really separates the boys from the men in cake decorating, especially when it comes to sculpted cakes. Even though 3D cakes have their own natural shadows, airbrushing adds extra dimension and realism with shading. I was really happy that we spent so much time practicing lines, gradients, and texture with the airbrush. For our final exam we airbrushed this woodgrain fondant cake. On its own I think it's really odd, but in three tiers with a chainsaw on top I bet it would make a really cool lumberjack wedding cake.

Using the most basic mold-making technique we learned, I created a chocolate shell molded in cornstarch and a chocolate frame molded in cocoa powder. You simply take the object that you want to recreate and press it into the powders. As you can see, it makes a fairly detailed impression. Cornstarch molds are an old candy maker's technique that is still used today. I know Sour Patch Kids and candy corn are made this way.

Saturday, September 18, 2010

Pastillage and the French Pastry School


After almost three years, I am back at the French Pastry School attending their very first session of l'Art du Gateau. The 16 week course focuses on everything cake, such as sugar and chocolate decoration, recipe creation, and business planning. If the school's l'Art de la Patisserie was like pastry boot camp, l'Art du Gateau is like pastry finishing school. The amount of focus and attention to detail can be maddening, but I've kept it together knowing that I'll come out with higher standards.


This week was devoted solely to pastillage. Pastillage is a dough made of confectionery sugar, gelatin, and vinegar, and is primarily used to make edible showpieces like the one I made in class. Because pastillage is slightly elastic when wet and dries hard, it can be rolled very thin. The end result is an appearance like matte porcelain.

I think everyone in class was surprised at how difficult it was to assemble our sculpture. The pieces were so delicate they snapped just from the vibrations of setting them on the table. We glued the sculpture together with hot sugar, and if used too hot the thermal shock cracked our pieces. If the sugar was too cold the pieces would falsely adhere and fall off later. The sounds of shattering leaves and stems filled the classroom for almost four hours! Only one student cried, but needless to say, we were stressed. I was thrilled that I didn't have that many pieces break and that I have something to show for all of my hard work this week.

Sunday, June 27, 2010

How Ophthalmologists Get Down

This week I used my teeny home kitchen to make an eyeball cake for an ophthalmologist friend's birthday. It's the first spherical cake I've made to this scale; not so difficult to build but pretty stressful to cover in fondant. Fondant stretches beautifully, but tends to pleat and wrinkle when covering a contracting shape, like the underside of an eyeball. The cake measured about 12 inches high so there was a lot of fondant to tame.

The veins are piped in royal icing and the iris painted with luster dust and lemon extract. I also have the optic nerve coming out the back and curving around front to spell "happy birthday." Much to my delight, the birthday boy wore his surgical scrubs to cut the cake!

Tuesday, April 6, 2010

Pastry Whirlwind: Wilton, Cakegirls, and the Swedish Bakery


Since I have neglected my page but plan to post cakes in the future, I thought I would try to bridge the gap by letting you know what I've been up to. A real transformation happened in October. I spent almost every day traveling down to the South Suburbs of Chicago to attend the Wilton School of Cake Decorating. It was my first experience decorating cakes every day. That, combined with the flood of new skills I learned, helped me to start making cakes that really represented my tastes and abilities.

The first two weeks were dedicated to the Master Course, an intensive piping regimen of flowers, figures, and borders, which resulted in my rose and pansy cake, which I posted in December. The second two weeks were with Colette Peters, owner of Collette's Cakes, in NY. Collette has a masters in painting from Pratt and worked as a designer at Tiffany’s for 10 years before becoming a decorator. Her cakes are flamboyant, free-spirited, and amazing! In her class tools were rarely used for their original purpose, and flowers were mostly called, "fantasy flowers.” It was important to me, when making cakes in her class, to use her techniques (like metallic painting and free-form carving) without stealing her style. The cakes I completed for Colette were the beetle and celestial cakes, which I also posted.

After Wilton I spent three months interning full time with the Cakegirls of Chicago. I was thrilled when they took me on because my love for their cakes verges on obsession. Chief designer Mary Maher’s cakes are stylish and artful, and she has developed a distinctive style that is regularly imitated. Mary taught me how to use molded chocolate and rice-crispy, how to add life with highlights and shadows, and when to balance bold statements with detail. Never once did she send me to get coffee or make me do dishes!

It was at Cakegirls that I learned that piping skills truly separate the boys from the men. Mary, and her sister Brenda both started out at an old-school buttercream bakery in Detroit, and as a result use a piping bag as if it’s an extension of their hand. I decided after my internship ended to apply to work at Chicago’s own old-world bakery, the Swedish Bakery in Andersonville. The place has been a neighborhood staple for 80 years, and they do everything from marzipan and whipped cream cakes to fondant and buttercream. Speed and a steady hand is my goal, and since we average what seems to be 50 cakes a day I think I’ll achieve it.

I’ve made a lot of cakes at work that I’d love to post on my blog, but out of respect for the businesses I’ll leave web-posting to the business owners and customers. When I find some time to create cakes at home, which I am looking forward to, I’ll be sure to post them here!

Tuesday, December 1, 2009

Saturday, June 6, 2009

Hibiscus and Birds of Paradise Cake

I decorated this cake for a tropically themed "castaway" party celebrating the removal of a kid's full-body cast.
I was pleased that the customer didn't ask me to write anything on the cake. The messages put on cakes seem more appropriate in a greeting card than on a dessert. I like the graphic simplicity of this cake. The flowers growing from the sides onto the top highlight the cake's nice shape rather than focusing only on the cake's flat top.

Sunday, April 26, 2009

Tiffany Blue

We were taught in school that blue is the least appetizing color because it is not a natural food color (even blueberries are really purple). However, I have found that a lot of people like their pastry to be Tiffany blue, probably because it is a color of glamour and status. I'd like for more of my cakes to take on the qualities of jewelry.

Thursday, April 16, 2009

Poodles and linzers

A 1950's inspired birthday cake.

Linzer cookies decorated with a little royal icing for Spring. The one in the center is filled with apricot preserve.

Monday, April 6, 2009

Pat the Bunny

Poppy seed, raspberry, and pear butter Hamentashen baked for my friends the Melnicks for Purim.


I like to make my own stationary when I write letters. I decided this time to incorporate some text in the drawing. I thought that a little graphic design practice might help my cake decorating. "Oma" is the German word for grandma.

A "Pat the Bunny" 1st birthday cake. It's hard to see in the photo that the sides of the cake are blue. The top of the cake is orange fondant and the bunny and flowers are gumpaste.

Another 1st birthday cake. You can see its only 4 inches next to the penny.

Sunday, March 22, 2009

Fred Anderson's 80th!

Last Sunday was a celebration/tribute concert at the Velvet Lounge in honor of Chicago jazz legend Fred Anderson's 80th birthday. My close friend, Dan Melnick, who works at the Jazz Institute of Chicago threw the party and asked me to make the cake. He said there was talk of a grocery store sheet cake and he wanted to treat Fred to something a little more special.

He gave me the image above to work off of, which is a photo of the much-loved wallpaper from the old location of the Velvet Lounge. The cake was about 14x18 inches, vanilla cake with vanilla buttercream (both with real Tahitian vanilla bean), and decorated with rolled fondant. Dan said the cake was a hit and that it may be featured in Down Beat magazine. Keep your fingers crossed!

Ninja Cake.

Easter Cookies.

We are holding an Easter cookie decorating class at le Flour on April 11th for kids 8-12. Each student will get white cookie canvases in the shapes of eggs, bunnies, flowers, and carrots (like the ones I've decorated above) and we will help them pipe, paint, and sprinkle to their heart's content. I am looking forward to the class because it's the first I'll teach professionally.

Although teaching has never interested me much, I like teaching art because you spend some time explaining and demonstrating, but most of the time is spent watching the students self-explore. The cookies are vanilla bean sugar cookies with royal icing. They don't hold their shape very well when baked, but they make up for that in delicacy and crumbliness.